
If we want to add custom user properties like “Age, Country & Salary” to the ASP.NET Core Identity Users then we can do this by adding Custom User Properties to the User class. The User class, as we all know, inherits from the IdentityUser parent class. These new custom properties are added as new columns to the AspNetUsers table of Identity database.
In my previous tutorial on Create, Read, Update & Delete users in ASP.NET Core Identity, I created the User class which does not have any custom property. Now in this tutorial I will teach how to add new properties to the User class.
![]()
Start by adding 3 new Custom User Properties to the AppUser.cs class:
using Microsoft.AspNetCore.Identity; using System.ComponentModel.DataAnnotations; namespace Identity.Models < public class AppUser : IdentityUser < public Country Country < get; set; >public int Age < get; set; >[Required] public string Salary < get; set; >> >
The Country property is an Enum , the Age property is of int type, and lastly the Salary property is of type string. We made the ‘Salary’ property as a required one by providing [Required] attribute to it.
Next, add a new class called Country.cs inside the Models folder which will serve as the enum for Country property. It’s code is given below.
namespace Identity.Models < public enum Country < USA, UK, France, Germany, Russia >>
Now we have added ASP.NET Core Identity Custom User Properties to our app. Next we need to update the Identity Database. For this we will run the Entity Framework Core Migration commands .
On the Package Manager Console window, run the following 2 commands:
dotnet ef migrations add MigrationNew dotnet ef database updateI have covered Identity Database creation with EF Core Migration commands in another article called Creating the Identity Database using the EF Core Migration Commands
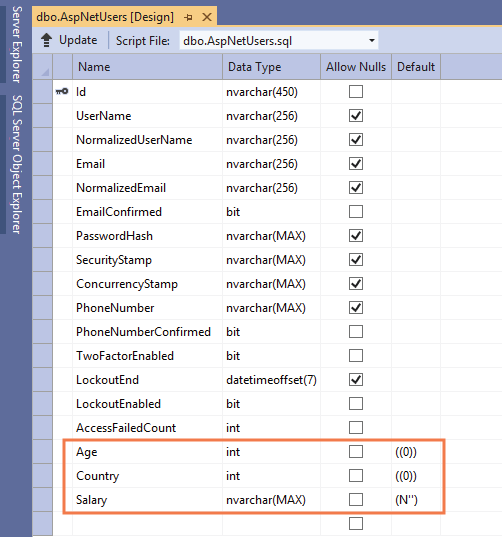
When the commands complete, the SQL table called AspNetUsers of the Identity Database (that stores user records), will contain 3 new columns added to it. These are Age, Country and Salary.
Open the AspNetUsers SQL table and check these 3 newly added columns. This is shown by the below given image.
Now we update the Create and Update Action methods of Admin Controller , to add the support for the Custom Properties that we just added. First we add these 3 new properties (Country, Age & Salary) to the User.cs class.
using System.ComponentModel.DataAnnotations; namespace Identity.Models < public class User < [Required] public string Name < get; set; >[Required] [RegularExpression("^[a-zA-Z0-9_\\.-]+@([a-zA-Z0-9-]+\\.)+[a-zA-Z]$", ErrorMessage = "E-mail is not valid")] public string Email < get; set; >[Required] public string Password < get; set; >public Country Country < get; set; >public int Age < get; set; >[Required] public string Salary < get; set; >> >
Next, we add 3 new HTML tags for these properties in the Create & Update Views so that users can enter the values for them during registration of a new user to Identity and also when updating a previous user. These views are located inside Views ➤ Admin folder. We use the input tags for the Age and Salary properties, and for the Country property we use the select tag.
The updated code of these 2 Views are given below:
Create.cshtml@model User @ < ViewData["Title"] = "CREATE USER"; >Update.cshtmlCreate User
Back
@model AppUser @ < ViewData["Title"] = "UPDATE USER"; >Update User
BackPassword
Finally, update the Create and Update actions of the Admin controller as shown in highlighted manner below.
Create Action[HttpPost] public async Task Create(User user) < if (ModelState.IsValid) < AppUser appUser = new AppUser < UserName = user.Name, Email = user.Email, Country = user.Country, Age = user.Age, Salary = user.Salary >; IdentityResult result = await userManager.CreateAsync(appUser, user.Password); if (result.Succeeded) return RedirectToAction("Index"); else < foreach (IdentityError error in result.Errors) ModelState.AddModelError("", error.Description); >> return View(user); >
There is just one change where we are adding the new custom properties values to the AppUser class object:
Country = user.Country, Age = user.Age, Salary = user.Salary[HttpPost] public async Task Update(string id, string email, string password, int age, string country, string salary) < AppUser user = await userManager.FindByIdAsync(id); if (user != null) < if (!string.IsNullOrEmpty(email)) user.Email = email; else ModelState.AddModelError("", "Email cannot be empty"); if (!string.IsNullOrEmpty(password)) user.PasswordHash = passwordHasher.HashPassword(user, password); else ModelState.AddModelError("", "Password cannot be empty"); user.Age = age; Country myCountry; Enum.TryParse(country, out myCountry); user.Country = myCountry; if (!string.IsNullOrEmpty(salary)) user.Salary = salary; else ModelState.AddModelError("", "Salary cannot be empty"); if (!string.IsNullOrEmpty(email) && !string.IsNullOrEmpty(password) && !string.IsNullOrEmpty(salary)) < IdentityResult result = await userManager.UpdateAsync(user); if (result.Succeeded) return RedirectToAction("Index"); else Errors(result); >> else ModelState.AddModelError("", "User Not Found"); return View(user); >
Related Tutorial: Actions in ASP.NET Core from Zero to Hero. Check that out!
int age, string country, string salaryuser.Age = age; Country myCountry; Enum.TryParse(country, out myCountry); user.Country = myCountry; if (!string.IsNullOrEmpty(salary)) user.Salary = salary; else ModelState.AddModelError("", "Salary cannot be empty");if (!string.IsNullOrEmpty(email) && !string.IsNullOrEmpty(password) && !string.IsNullOrEmpty(salary))Testing the Custom User Properties
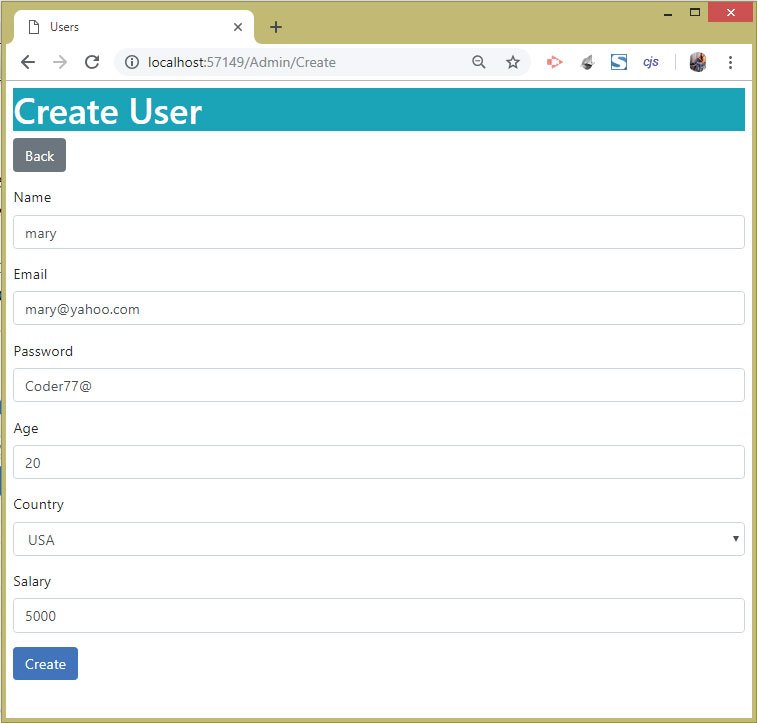
To test these newly added Custom User Properties, run the project and go to the Create User page whose URL is https://localhost:7263/Admin/Create. In this page we will see these 3 new fields which we added, as shown by the below image. Create a new user with the following details:
1. Name – mary
2. Email – [email protected]
3. Password – Coder77@
4. Age – 20
5. Country – USA
6. Salary – 5000
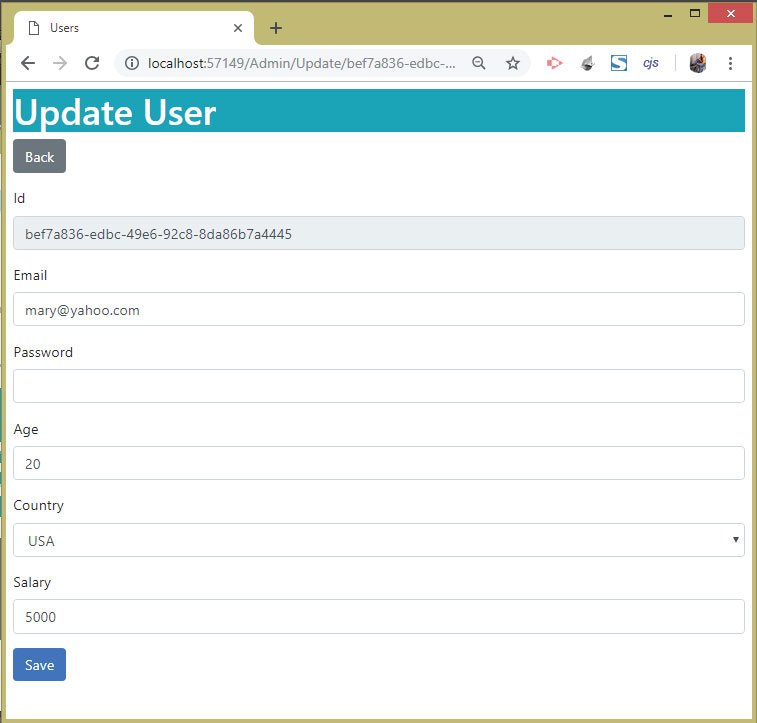
Once the user is created, click to update it’s records. This will take us to the Update View where we will see all the new value, which we added, inside the 3 respective fields. See the below image:
This completes the tutorial, now download the full source codes from the below link:
ConclusionIn this tutorial on ASP.NET Core Identity Custom User Properties we learned the way to add new fields to the Identity user. Now we can easily add as many new fieds to the Identity Users as we like.